$10 Stripping Basket Hack
Anyone who fly fishes for stripers, saltwater or trophy trout and will be making hundreds of casts a day from a stationary location will need a good stripping basket. I recently priced them and couldn’t find any of the solid baskets for under $50. I had a hard time believing that I had to pay $50 for a simple plastic basket with some inserts and a belt. My guess is that these are manufactured in China for around $7. The Orvis basket retails for $85! Check it out http://www.orvis.com/p/durable-stripping-basket/1433?item_code=14336000&adv=127748&cm_mmc=plas-_-FlyFishing-_-1433-_-127748&kpid=1433-60-00&kpid=1433-60-00&gclid=CI-ItfKk_MMCFRSPfgodMgcAgg
There are flexible baskets that retail for much less but anyone who has done any amount of casting will know that the “line fingers” are very important to keep out tangles as you cast. A big trout ripping out line after hook set will also leave no room for error if a tangle happens and a knot hits a rod guide. I kept looking.
I couldn’t find anything that I liked and was reasonably priced so I decided that I would build my own. There are a LOT of tutorials on the web with different baskets but I couldn’t find a solution that I totally liked. Most of the baskets were rectangular and I knew that wasn’t going to ride well on my hips. I needed to find a basket with a contour that would fit like a regular stripping basket. I thought about modifying a rectangular basket by removing a section of plastic to form a curve but that seems like a lot of work to make it work correctly. I like simplicity and efficiency. My goal was to build a basket for a reasonable price that was very simple to put together and works well.
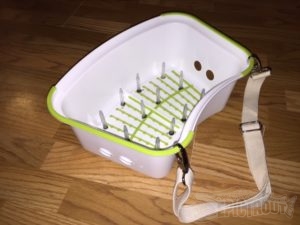
I poked around a little longer on the web and found someone who had found a near perfect “basket”. He had found an IKEA step stool with a contour and good sizing. The stool even had some holes on each side that would work perfectly for water drainage. Kudos to him for finding it! I picked one up at the local store for $6. They come in a few different colors. I chose white and green.
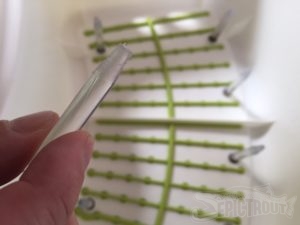
The next step was to come up with some “line fingers”. I had seen guys do pen caps, zip ties and nylon bolts. All of these work well but I wanted to come up with something a little more elegant. I was looking for something that I could install into the basket without drilling a hole, if possible. I also wanted something that was slick and flexible so the line would slide off of the inserts. I finally came up with the idea to use glue gun sticks. My wife is a scrap book nut so I had plenty to choose from. The “mini” size looked perfect to me. I cut each stick in half to get the desired length.
I needed to get them pointed at the top so the line wouldn’t hang up. I noticed they were about the size of a pencil and figured the easiest way to point them would be to “sharpen” them with a simple hand held pencil sharpener. I tried it and it worked like a charm.
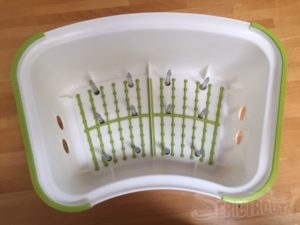
Next step was to attach them to the basket. The IKEA stool has 4 round “cups” on the inside that fit the glue sticks perfectly. This gave me a symmetrical base to get the line fingers centered perfectly. I roughed up the attachment points with a course grit sandpaper to give the glue something to grab onto and heated the base of each half stick for a few seconds with a long reach lighter and pushed each into place. They secured nicely.
The final step was the belt. Most people are using a belt that threads through the back of the stripping basket. I wanted to see if I could come up with a better solution. I thought about it a while and ended up drilling two holes to make attachment points and used a belt with two clips, one on each side. This ensures the basket always sits correctly and works well for me.
The beauty of this solution is all of my costs were around $10 and it takes around 30 minutes to put together. I hope some of you guys try this and good luck on your big fish hunt!
Mark Knoch